Side Burner 700 Series – Napoleon

Price range: 449,00 € through 999,00 € (VAT inc.)

✅ Available in single, dual, sizzle zone, hotplate or wok versions

✅ Power outputs up to 12 kW and temperatures up to 980 °C

✅ WAVE™ stainless steel grates (7.5 or 9.5 mm depending on model)

✅ JETFIRE™ ignition system and Safety Glow™ control knobs

✅ Recessed installation in non-combustible materials

✅ Stainless steel grease tray and stainless steel lid included

✅ Perfect solution for cooking sauces, searing meats or using a wok

Configure it to your liking

Clear selection

Complete your set

See more

Your selections

Total price

SKU: BIB-SET Categories: ,
Métodos de pago

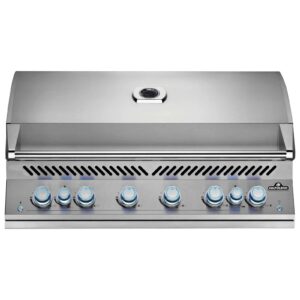
When it comes to perfection in outdoor cooking, a good grill is not enough. Discerning chefs and barbecue enthusiasts know that the true dining experience requires specialised, versatile and powerful tools. The Napoleon 700 Series Side Burner embodies that ideal. Its professional-inspired, built-in design, combined with the most advanced ignition technology on the market and robust materials, makes it an essential component for any outdoor cooking project.

Whether you want to sear a steak in true steakhouse style, prepare a wine reduction sauce or create a stir-fry with pinpoint precision, this range of burners offers a specific solution for every need. With multiple variations available, from single infrared burners to dual burners or dual-phase wok burners, the 700 Series is perfectly suited to all cooks, from the gourmet who cooks for their family to the restaurateur who serves on busy terraces.

Key features common to the entire 700 Series

Technological excellence, state-of-the-art safety and highly durable construction in all variants

Although each model in the 700 Series has unique features that set it apart, they all shareseveralf high-end technologies and components that ensure an uncompromising standard of quality. These common features are the hallmark of Napoleon as a manufacturer of elite outdoor cooking solutions.

Safe, instant and effortless start-up

One of the great operational advantages of this series is its JETFIRE™ ignition system, an innovation that redefines the way a gas burner is activated. Instead of relying on external igniters or complicated systems, JETFIRE™ uses an internal pilot flame, generated by an auxiliary nozzle, which automatically ignites the burner when the knob is turned. This system not only offers convenience but also eliminates one of the most common risks in outdoor kitchens: failed ignition attempts.

It works even in windy, humid or extremely cold conditions, providing a steady, visible and powerful flame. It is ideal for both novice users and expert chefs looking for operational efficiency with no margin for error. In addition, its long-lasting reliability reduces wear on ignition components.

Night-time visibility, absolute control and immediate visual safety

Another distinctive feature of the 700 Series is the Safety Glow™ system, exclusive to Napoleon, which incorporates LED technology into the gas control knobs. These knobs not only enhance the overall look with a soft, sophisticated glow, but also serve as an immediate visual safety feature:

  • Blue: The burner is off, and there is no gas flow.

  • Red: the burner is on and gas is actively flowing.

This simple and clear colour code allows even the user or anyone else to know from a distance whether there is an active flame, which minimises the risk of accidents and forgetfulness, especially at night or in dimly lit environments. This system is also ideal for families with children, where visibility of the appliance’s status can make a significant difference to safety.

In addition, the Phantom model in the series incorporates an even more sophisticated version of the system, called Night Light™, which enhances visibility with an elegant lighting effect on dark finishes.

Perfect heat distribution and exclusive functional design

All 700 Series Side Burner models are equipped with the now iconic WAVE™ grates, a Napoleon patented design that combines form and function. These grates feature a wave shape that offers multiple advantages:

  1. Even heat distribution: the curved shape channels heat and distributes it evenly across the entire cooking surface, resulting in balanced, professional cooking results.

  2. Prevents food from falling through: thanks to its curvature, small foods such as asparagus, prawns or chopped vegetables do not fall through the gaps in the rack.

  3. Easy to clean: The 7.5 mm or 9.5 mm stainless steel, depending on the model, is not only extremely durable, but also resists grease build-up and is easy to keep shiny with simple care.

The 9.5 mm grids, available in dual and wok models, are particularly recommended for intensive use, as they can withstand the weight of large pots or cast iron griddles without warping.

Seamless integration and maximum resistance

All burners in this series are manufactured to the quality standards of high-end built-in appliances. This means they can be integrated aesthetically, safely and functionally into any outdoor kitchen made from non-combustible materials such as natural stone, stainless steel, concrete or ceramic tiles.

Their compact yet robust design allows you to make the most of your space without compromising on power. In addition, the heavy-duty stainless steel outer casing is treated against corrosion, heat wear and UV discolouration, ensuring a flawless appearance for many years to come.

This built-in design, combined with the variety of models available, allows architects, interior designers and chefs to build customised modular kitchens with a professional look.

Safety and compatibility are assured

Each 700 Series unit includes a two-stage gas pressure regulation system, which ensures a constant and stable supply of propane gas, adapting to outdoor conditions. This configuration not only improves burner performance but also protects internal components from premature wear.

The standard European connection of 1/4-inch left external thread allows any standard low-pressure hose to be installed without the need for special adapters. This makes the product compatible with installations in homes, restaurants or commercial areas. In addition, an optional bypass valve allows the same gas cylinder to be shared with a Napoleon built-in grill, optimising consumption without compromising power.

This system also includes safety features such as non-return valves and quick-release connections, making installation and removal easy in portable kitchens or mobile stations.

The N370-1091-SER power supply kit is required for all integrated 700 series burners used in an installation without an integrated 700 series grill in order to supply power to the control knobs.

Technical comparison table of performance and use of each variant

ModelBurner typeTotal powerCooking areaWAVE™ grid thicknessKnob lightingRecommended use
Single InfraredCeramic Infrared2.9 kW23 x 26.5 cm7.5 mmYes (Night Light™ with SafetyGlow)Quick searing of meat and fish
Single OvenTraditional ring2.9 kW30 x 26 cm7.5 mmYes (Night Light™ with SafetyGlow)Side dishes, soups, pasta and sauces
Individual Phantom InfraredCeramic Infrared2.9 kW23 x 26.5 cmSolid stainless steelYes (Night Light™ with SafetyGlow)Precision cooking with modern design
Dual InfraredCeramic Infrared x28.8 kW44.5 x 46 cm9.5 mmYes (Night Light™ with SafetyGlow)Large volumes of meat, parallel cooking
Dual Stage (Wok)Double-controlled ring12 kW44.5 x 46 cm9.5 mmYes (Night Light™ with SafetyGlow)Asian cooking, stir-frying and extreme precision
Dual OvenTraditional double ring8.8 kW44.5 x 46 cm9.5 mmYes (Night Light™ with SafetyGlow)Simultaneous cooking of several dishes
Linear Dual OvenTraditional double ring8.8 kW45.7 x 28.2 cm9.5 mmYes (Night Light™ with SafetyGlow)Preparation of sauces, soups and side dishes completely independently of the main grill

Distinctive features of each model

Each variant meets a specific need with clear, functional and strategic advantages for the end user

The Napoleon 700 Series is not a generic collection of side burners; it is a modular system designed to solve specific cooking situations with the highest level of specialisation. Each variant has been conceived to expand the capabilities of an outdoor kitchen, optimising resources, space and, above all, the experience of the cook and the diner. Below, we detail the unique and distinctive features of each model, explaining why they do not compete with each other, but rather complement each other, depending on the user profile and the style of cooking they wish to develop.

Individual Infrared

The ideal ally for those who want to take meat searing to the level of a professional steakhouse.

The single infrared burner is the most compact mode,l specialising in localised high temperatures. Designed to reach extreme temperatures of up to 980 °C in seconds, it allows you to seal meat and fish with a crispy outer crust, while retaining their internal juices thanks to minimal exposure time.

Its design makes it the preferred choice for those who value precision in cooking proteins, such as ribeye, entrecôte or sirloin fans. It is particularly useful for techniques such as reverse searing, where the meat is cooked slowly on the main grill and finished with a burst of heat on the burner.

In addition, thanks to its built-in shape and optimised size, it integrates easily into outdoor kitchens without the need for major renovations, making it perfect for both small spaces and complete cooking stations.

Single Burner

The practical and versatile solution for those who need a functional auxiliary kitchen without compromising on professional design.

This model is designed for those who want to expand their cooking capacity without taking up space on the main hob. The single hob is ideal for preparing sauces, pasta, soups, creams, or even frying food directly in a pan or pot, without having to move inside the house.

Its 2.9 kw power allows for stable and fast cooking, ideal for those who cook with different types of containers. In addition, its height-adjustable grill adds a degree of heat control that is rare in models of this type, allowing you to move the flame closer or further away depending on the type of preparation.

The single hob converts any outdoor kitchen into a truly autonomous space, allowing you to cook complete meals from start to finish without relying on other appliances.

Phantom Infrared

An exquisite combination of professional performance and modern design that adapts to the most sophisticated outdoor kitchens.

The Phantom model stands out for its textured matt black finish, which is weather-resistant and has a sober and elegant appearance. It is much more than just a matter of aesthetics: its surface does not reflect direct light, which is particularly useful in environments with sophisticated ambient lighting, such as gourmet terraces or outdoor kitchens in contemporary homes.

In terms of performance, it inherits all the features of the single infrared model: power, sealing, speed and thermal efficiency. But it goes further by incorporating Night Light™ lighting, a variant of the Safety Glow™ system that offers more elegant and functional lighting, perfect for cooking at night with total visibility.

This model is designed for users who seek aesthetic excellence without compromising on professional functionality, making it a favourite among architects, outdoor designers and private chefs.

Dual Infrared

Maximum production capacity for those who cook in large quantities without sacrificing quality in every preparation.

This model has two independent infrared ceramic burners, with a total power of 8.8 kW and allowing extremely high temperatures to be reached over a large cooking surface. It is the ideal solution for those who need to cook for large groups, events, family parties or even small professional outdoor services.

It’s 44.5 x 46 cm cooking space allows you to work with multiple pieces of meat, steaks, burgers, whole fish or large vegetables. It is the perfect tool for achieving uniform and simultaneous sealing without losing heat between batches.

In addition, as it has two controllable heat zones, it allows you to work with different heat intensities at the same time, facilitating cross-cooking with different cooking levels.

Double Phase Wok Burner

The most advanced gourmet tool for professional wok and pot cooking with controlled heat.

This model is a true cooking station in its own right. Equipped with two independently controllable concentric ring burners, it allows you to operate from very low temperatures (ideal for melting, reducing or simmering) to powerful Asian-style flares.

Thanks to its specially designed grid for wok supports, it allows you to cook with round pans with curved bases, cast iron pots, griddles and casseroles. In addition, the inner ring can be removed to place the wok directly on the heat source, allowing techniques such as stir-frying, quick sautéing or indirect steaming with a precision that is difficult to match.

It is aimed at advanced cooks, chefs who fuse styles, or lovers of Asian cuisine who want to control every detail of their preparation.

Dual Hob

The most versatile cooking station for those who want to cook multiple dishes simultaneously, without limitations.

The dual hob is the ideal choice for chefs who prioritise efficiency and flexibility. Its two independent burners, each with a power output of 4.4 kW (8.8 kW in total), allow you to work with two pans, two pots or two different techniques at the same time: sauté on one side while boiling on the other, for example.

This is particularly useful for those who prepare complete meals outdoors: starters, main courses and side dishes can be cooked simultaneously without affecting the main grill. In addition, like other models, it features heavy-duty stainless steel WAVE™ grates and Safety Glow™ knobs, making it practical and safe.

This is an essential tool in high-traffic outdoor kitchens, ideal for large families, frequent gatherings, shared kitchens or chefs who work outdoors and need autonomy.

Dual Linear Burner

The most versatile cooking station for those who want to cook multiple dishes simultaneously, without limitations.

The Dual Linear built-in burner is one of the most balanced solutions in the range, combining power, functional design and compatibility with other 700 Series equipment. Equipped with two high-performance traditional ring burners (4.4 kW each, 8.8 kW in total), this model offers a large cooking area of 1,290 cm² for operating two pots, pans or different preparations simultaneously.

Its design is intended for those seeking total independence from the main grill. Whether preparing sauces while grilling meat, boiling pasta, frying side dishes, or even cooking complete meals in parallel, this model provides a fully functional auxiliary cooktop within the same outdoor module.

Like all models in the series, it features the iconic WAVE™ stainless steel grates (9.5 mm thick), the JETFIRE™ ignition system and NIGHT LIGHT™ knobs with SafetyGlow. This makes it powerful, safe, visible and stylish, ideal for use even in dimly lit areas.

Advanced maintenance and usage guide

Protect your investment, guarantee safety and extend the useful life of your burner with proper careMaintaining high-end built-in burners such as Napoleon's 700 Series is not only a recommended practice, but an essential requirement to ensure maximum performance, safety during use and the preservation of design and functionality. Below is a detailed step-by-step guide covering everything from installation to long-term storage.

1. Preparation and safe installation

  • Proper location: Make sure to install the burner only on countertops or non-combustible surfaces such as natural stone, stainless steel, concrete or granite.
  • Avoid flammable materials: If the installation is close to wood, plastics or other combustible materials, use a recessed frame or certified fireproof insulation.
  • Check the fitting measurements: Each model has specific opening dimensions. Follow the manufacturer's recommended measurements exactly.

2. High-precision gas connection

  • Type of connection: Use a 1/4’ low-pressure propane gas hose compatible with the DIN standard left-hand thread connection.
  • Working pressure: Make sure to use a regulator of 30 mbar, the European standard for propane gas.
  • Integration with other equipment: If the kitchen includes a built-in Napoleon grill, you can use a bypass valve to operate both devices with a single cylinder. Always check the maximum flow rate of the regulator.

3. Leak test before each use

  • Soapy solution: Mix soapy water or detergent and apply with a sponge or sprayer to all threaded connections.
  • Visual detection: Slowly open the gas valve and watch for bubbles. If there are any, readjust the connection until they disappear.
  • Extreme caution: Never use fire or heat sources to detect leaks.

4. Safe lighting and control

  • JETFIRE™: Turn the burner knob to the ignition position and press the JETFIRE™ button. The pilot flame will light the burner immediately.
  • Illuminated knobs: Check the status of the burner by the colour of the knob.
    • Red: lit
    • Blue: off

5. Daily cleaning after each use

  • Turn off and disconnect the gas before cleaning.
  • Remove the grill and the grease tray. Wash with warm water, mild soap and a non-abrasive sponge.
  • Immediate drying: Dry all components thoroughly before reassembling, avoiding the formation of rust or moisture stains.
  • Cleaning the exterior: Use a damp cloth and a specific cleaner for stainless steel. Never use chlorine, ammonia or abrasives.

6. Monthly preventive maintenance

  • Checking the flame: The flame should be an intense blue. A yellow flame indicates an obstruction or dirt in the nozzles.
  • Check valves: Make sure the knobs turn smoothly. Apply silicone grease if stiff.
  • Clean inside: Check for possible grease build-up inside the burner body and clean with a soft brush.

7. Long-term storage

  • Protect outside: Use waterproof, breathable covers to prevent rust.
  • Disconnecting the gas: Turn off the gas and disconnect the hose if it will not be used for long periods of time.
  • Storing accessories: Store the grills, lids and trays in a dry place away from moisture.

Advanced maintenance and usage guide


Protect your investment, guarantee safety and extend the useful life of your burner with proper care

Maintaining high-end built-in burners such as Napoleon's 700 Series is not only a recommended practice, but an essential requirement to ensure maximum performance, safety during use and the preservation of design and functionality. Below is a detailed step-by-step guide covering everything from installation to long-term storage.

1. Preparation and safe installation


  • Proper location: Make sure to install the burner only on countertops or non-combustible surfaces such as natural stone, stainless steel, concrete or granite.

  • Avoid flammable materials: If the installation is close to wood, plastics or other combustible materials, use a recessed frame or certified fireproof insulation.

  • Check the fitting measurements: Each model has specific opening dimensions. Follow the manufacturer's recommended measurements exactly.


2. High-precision gas connection


  • Type of connection: Use a 1/4’ low-pressure propane gas hose compatible with the DIN standard left-hand thread connection.

  • Working pressure: Make sure to use a regulator of 30 mbar, the European standard for propane gas.

  • Integration with other equipment: If the kitchen includes a built-in Napoleon grill, you can use a bypass valve to operate both devices with a single cylinder. Always check the maximum flow rate of the regulator.


3. Leak test before each use


  • Soapy solution: Mix soapy water or detergent and apply with a sponge or sprayer to all threaded connections.

  • Visual detection: Slowly open the gas valve and watch for bubbles. If there are any, readjust the connection until they disappear.

  • Extreme caution: Never use fire or heat sources to detect leaks.


4. Safe lighting and control


  • JETFIRE™: Turn the burner knob to the ignition position and press the JETFIRE™ button. The pilot flame will light the burner immediately.

  • Illuminated knobs: Check the status of the burner by the colour of the knob.

    • Red: lit

    • Blue: off


5. Daily cleaning after each use


  • Turn off and disconnect the gas before cleaning.

  • Remove the grill and the grease tray. Wash with warm water, mild soap and a non-abrasive sponge.

  • Immediate drying: Dry all components thoroughly before reassembling, avoiding the formation of rust or moisture stains.

  • Cleaning the exterior: Use a damp cloth and a specific cleaner for stainless steel. Never use chlorine, ammonia or abrasives.


6. Monthly preventive maintenance


  • Checking the flame: The flame should be an intense blue. A yellow flame indicates an obstruction or dirt in the nozzles.

  • Check valves: Make sure the knobs turn smoothly. Apply silicone grease if stiff.

  • Clean inside: Check for possible grease build-up inside the burner body and clean with a soft brush.


7. Long-term storage


  • Protect outside: Use waterproof, breathable covers to prevent rust.

  • Disconnecting the gas: Turn off the gas and disconnect the hose if it will not be used for long periods of time.

  • Storing accessories: Store the grills, lids and trays in a dry place away from moisture.

  • Burner type: Ring burner (double)
  • Power: 8.8 kW (2 burners)
  • Grill area: 45.7 x 28.2 cm (approx. 1,290 cm²)
  • Grill material: 9.5 mm WAVE™ stainless steel
  • Ignition system: JETFIRE™
  • Knobs: NIGHT LIGHT™ with SafetyGlow™
  • Installation: Direct, only on non-combustible surfaces
  • Gas type: Natural gas or propane (depending on configuration)
  • Design: Recessed
  • Dimensions (W x D x H): 54.6 x 62.5 x 29.5 cm
  • Weight: 34.5 kg
  • Installation opening dimensions: 45.7 x 49.3 x 26 cm

🍤 Creamy pasta with garlic shrimp and sautéed asparagus

(Serves 2 to 4 people – Total time: 25-30 minutes)

An elegant and simple recipe that allows you to use both burners on your double burner: one for the pasta with sauce and the other for the shrimp and asparagus. Perfect for outdoor cooking without relying on the indoor kitchen.

🔪 Ingredients:

For the pasta:

  • 250 g fettuccine or tagliatelle pasta

  • 200 ml cooking cream

  • 2 cloves of garlic (chopped)

  • 50 g grated Parmesan cheese

  • 2 tablespoons butter

  • Salt and pepper to taste

  • Zest of ½ lemon (optional)

  • A dash of olive oil

  • For the garlic prawns and asparagus:

    • 300 g of cleaned prawns

    • 1 bunch of green asparagus (cut into thirds)

    • 2 cloves of garlic (sliced)

    • 1 tablespoon of butter

    • Olive oil

    • Salt, pepper and chilli to taste

    • Chopped fresh parsley for garnish

🔥 Preparation on the double linear burner:

🔹 First burner Cooking the pasta and creamy sauce:

  1. Fill a medium saucepan with salted water and place it on the first burner. Bring to a boil and cook the pasta al dente according to the package directions.

  2. While the pasta is boiling, melt the butter in a separate pan and sauté the chopped garlic until golden brown.

  3. Add the cream and cook over medium heat. Add the Parmesan cheese and mix well until you have a creamy sauce. Season with salt, pepper and, if desired, lemon zest.

  4. Drain the pasta and mix it with the sauce directly in the pan. Keep warm.

🔹 Second Burner – Garlic prawns and sautéed asparagus:

  1. In another pan, heat olive oil and a little butter. Sauté the sliced garlic and chilli pepper.

  2. Add the prawns and cook for 2-3 minutes on each side, until they turn pink. Season with salt and pepper and remove from the heat.

  3. In the same pan, add a little more oil if necessary and sauté the asparagus until tender but crisp (approx. 5 minutes). Season with salt and pepper to taste.

🍽️ Final assembly:

Serve the creamy pasta in deep plates, place the prawns on top and accompany with the asparagus. Add chopped fresh parsley and a drizzle of extra virgin olive oil at the end. Perfect for a gourmet evening of outdoor cooking!

🛠️ Tips for the linear burner:

  • Use the left burner on medium-high heat for boiling and quick sautéing.

  • Use the right burner on medium heat to control reductions and maintain temperature without overcooking.

  • Thanks to the WAVE™ grates, you can use large pans or even small griddles without risk of instability.