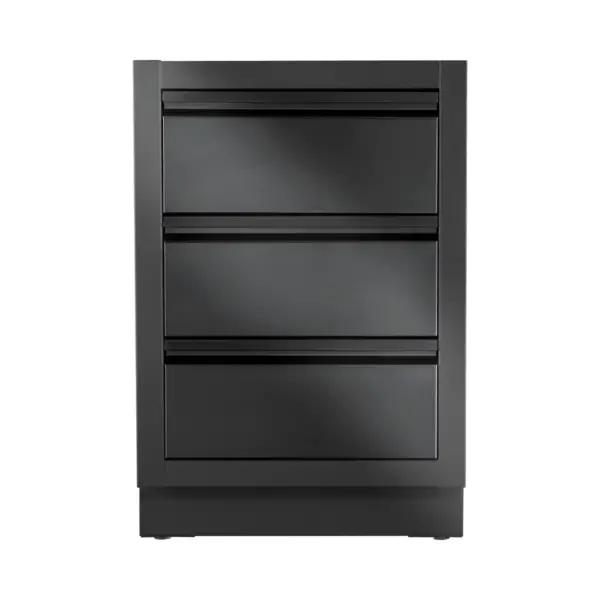
This module brings real storage capacity and visual continuity to your island. The base is a powder-coated galvanneal steel cabinet with a two-layer pebbled finish system that increases weather resistance. The drawer fronts are stainless steel and the visible colour is matt black. Installation is streamlined with holes prepared for gas and electricity and levelling feet to correct uneven floors. The worktop is not included and the unit arrives fully assembled from the factory. The guarantee is limited to ten years according to the manufacturer’s specifications. Height ninety centimetres width sixty-one centimetres depth sixty-one centimetres. These measurements apply to both variations.
🧱 Materials and construction
The structure uses galvanneal steel with matt black powder paint. The visible finish uses a two-layer pebbled system that adds durability and aesthetic stability outdoors. The drawer fronts are made of stainless steel with a sober presence that harmonises with the rest of the system. The module is delivered assembled, which reduces construction time and field operations. The combination of galvanised body with pebbled finish and stainless steel fronts is confirmed by the manufacturer in the description and key features of both models.
⚙️ Outstanding features
The design incorporates holes prepared for routing gas and electricity lines. This provision simplifies the connection of equipment and avoids improvised drilling during assembly. The levelling feet allow the front to be aligned and the worktop to be flush even when the floor has slight variations in level.
The version with false top front is designed to install a small sink or a built-in burner on top of the unit, while maintaining two real drawers for daily use. In the three-drawer version all levels are functional and provide a generous volume for outdoor kitchen accessories and spices.
🚀 Performance on the construction site and in use
The fully assembled delivery speeds up project planning. The installer presents the module in position, levels with the legs and routes services through the allocated holes.
By working with stable centimetre measurements, the envelope design can be prepared in advance and the position of the built-in grill and other Oasis modules can be coordinated. The result is a continuous line and a balanced work surface for smooth service in the cooking and support area.
🖤 Phantom design and aesthetics
The matt black colour creates a uniform reading of the front and unifies the island with a contemporary aesthetic. The stainless steel drawer fronts add presence and a sense of robustness, while facilitating daily cleaning.
The visual continuity of the whole is maintained both in the three-drawer version and in the version with a false front, as the external top is identical and the ninety-centimetre height matches the lines of the other modules in the system.
🔗 Compatibilities and island role
The module is part of the Oasis family and is designed to be combined with other modular cabinets and with the grill unit of the same system. The variant with false front is placed under or next to the water point or the recessed burner area to accommodate the plumbing elements or the burner above it without breaking the symmetry of the front.
The official description explicitly states that the upper front is non-functional and has been designed for such integration with small sink or built-in burner.
🍖 Benefits for different styles of outdoor kitchen
The perfect outdoor kitchen needs plenty of storage and a durable finish that withstands the elements.
With three deep drawers or two drawers and false front you get quick access to accessories, spices and tools during grilling, pizza baking or preparation and plating areas.
The manufacturer emphasises the abundance of storage and the focus on outdoor conditions thanks to the galvanised body with two-layer pebbled finish.
🛡️ Safety and ease of use
The levelling feet maintain stability and load distribution even if the floor surface is not perfect. Prepared holes guide gas and electricity pipes with clear routes that reduce crossovers and improve maintenance accessibility.
The indication that the worktop is not included is a reminder that each project must select an outdoor-grade envelope and install it according to the surface manufacturer’s instructions. Ten-year limited warranty provides long-term peace of mind for all Oasis elements.
Detailed usage and installation plan in centimetres
Matte black finish with galvanised steel body and two-layer pebbled powder coating
Stainless steel drawer fronts
Unit delivered fully assembled
Holes prepared for gas and electricity
Levelling feet
Worktop not included
Cabinet dimensions in centimetres: height 90, width 61, depth 61 in both variations
Pre-construction phase
- Review the island plan and confirm that each space is 90 high, 61 wide and 61 deep for this module
- Ensure that the floor is firm and can be levelled with the integrated legs
- Define the route of the gas and electricity lines that the module can accommodate through the holes provided, as indicated by the manufacturer
- Choose a worktop material suitable for outdoor use and confirm the fixing system and expansion gaps with the manufacturer
- Check access routes for moving the assembled unit into its final position and organise the manoeuvre with corner and stainless steel front protections
Positioning and levelling
- Place the module in its location and adjust the legs until the front is perfectly vertical and the top is completely horizontal
- Use a long ruler to check continuity with neighbouring modules and adjust the height of the legs until the top surface is at the same level
- Lock the position and check that the drawers open and close smoothly to confirm that the unit is not twisted by the floor
- Repeat the process after installing the worktop to ensure that the top surface has not been altered by the weight of the worktop
Worktop and coordination with the rest of the system
- Cut the worktop according to the project measurements and the worktop manufacturer's instructions
- Place the worktop on all the modules and check that the drawer module leaves a clean, aligned edge
- Fix the worktop according to the manufacturer's recommended procedure, respecting the planned service spaces
- In projects with a built-in grill, add the Oasis system under-grill unit, which the manufacturer suggests combining with these cabinets for a complete outdoor kitchen
Integration of the variation with false top front
- Confirm that the element to be installed on the module can be a small sink or a built-in burner as indicated in the technical data sheet.
- Mark the position of the sink or burner on the worktop and make the cuts following the instructions for the chosen equipment.
- Check that the upper front of the cabinet is non-functional and designed to reserve the technical space for the siphon or burner body.
- Connect the plumbing or burner supply and route the lines through the holes in the cabinet, avoiding sharp bends
- Check that the siphon, taps, hoses or wiring do not encroach on the space in the two drawers before closing everything
- Check the levelling again to ensure proper drainage in the sink, where applicable
Route services through the prepared holes
- Locate the holes prepared for gas and electricity that the manufacturer has incorporated to simplify installation
- Decide which side or rear you will use for the entry of each line according to the layout of the work
- Protect the perimeter of the passages with the grommets or trims that your installer uses on site and that are not specified by the manufacturer
- Maintain wide bending radii without pinching and leave the register accessible for future inspections
- When finished, perform a functional test of the gas installation and electrical circuits in accordance with local regulations
Final checks
- Open and close each drawer, checking for regular alignment and that there is no friction against the worktop or adjacent modules
- Check that the visual line of the matt black front is continuous and without steps between modules
- Confirm that the worktop is perfectly flush with the unit and that the joints with walls or cladding allow for expansion
- In the false front version, check that the plumbing or burner connections do not touch the structure of the unit or the drawer fittings
Daily use with organisation by levels
- Upper drawer in the three-drawer version for small utensils and condiments; the same position is a non-functional front in the version with sink
- Middle drawer for cooking accessories, thermometers and serving items
- Lower drawer with capacity for bulky items such as cutting boards or containers
- Keep the work area clear and return each item to its level to speed up the flow of the kitchen, as promoted by the manufacturer, highlighting abundant storage
Daily cleaning of the finish and stainless steel fronts
- Remove dust, saltpetre or splashes with a soft cloth and neutral cleaner
- Dry completely before closing the drawers to preserve the fittings and the appearance of the matte black front
- Avoid abrasive products that are not recommended by the countertop finish supplier, as the countertop is not included and each material requires its own care
- On stainless steel fronts, use movements in the direction of the polish to maintain the professional aesthetic highlighted by the manufacturer
Suggested scheduled maintenance
- Monthly check of the levelling and smoothness of each drawer
- Six-monthly check of visible fixings and the condition of the gas and electricity connections created with the prepared holes
- Inspection after rain or wind storms to remove deposits and clean again with a soft cloth and neutral product
- Annual visual continuity check of the front and correct alignment with the rest of the Oasis modules to maintain a uniform appearance
Specific tips for outdoor climates
- In marine environments, clean more frequently to remove saltpetre from stainless steel fronts and matt black finishes
- In areas with dust in suspension, increase light cleaning and prevent particles from entering the guides
- If the flooring settles, adjust the levelling feet until the surface is level and the drawers close smoothly. The manufacturer indicates that these feet allow the surface to be levelled even if the patio is not perfectly level.
Resolving typical issues without opening the fittings
- The drawer does not close smoothly. Check the level of the module and remove any objects that are blocking the movement.
- The front rubs against the worktop. Lower the corresponding front leg by one or two millimetres until the edge is free.
- The drawer hits an installation. Check the layout of the lines and rearrange the route through the prepared holes, avoiding the drawer area.
- Appearance of water or salt marks. Remove them with a soft cloth and neutral cleaner and dry immediately.
In-depth usage and installation plan in centimetres
Matt black finish with a galvanised steel body and two-coat pebbled powder coating
Stainless-steel drawer fronts
Unit delivered fully assembled
Pre-prepared openings for gas and electricity
Levelling feet
Worktop not included
Cabinet dimensions in centimetres: height 90, width 61, depth 61 in both variations
Pre-construction phase
- Check the island plan and confirm that each space is 90 cm high, 61 cm wide and 61 cm deep for this module.
- Ensure the floor is firm and can be levelled using the integrated feet.
- Define the route of the gas and electrical lines that the module can accommodate through the pre-prepared openings, as indicated by the manufacturer.
- Choose a worktop material suitable for outdoor use and confirm the fixing system and expansion gaps with the manufacturer.
- Check access routes for moving the fully assembled unit into its final position and organise the manoeuvre with protection on corners and stainless fronts.
Positioning and levelling
- Place the module in its location and adjust the feet until the front is perfectly vertical and the top fully level.
- Use a long straightedge to check continuity with neighbouring modules and adjust the feet height until the top surface is at the same level.
- Lock the position and check the drawers open and close smoothly to confirm the unit is not being twisted by the floor.
- Repeat the process after fitting the worktop to ensure the top plane has not been altered by the weight of the surface.
Worktop and coordination with the rest of the system
- Cut the worktop according to the project dimensions and the worktop manufacturer’s instructions.
- Place the worktop on all modules and confirm the drawer module leaves a clean, aligned edge.
- Fix the worktop according to the manufacturer’s recommended procedure, respecting the planned service clearances.
- For projects with a built-in grill, add the Oasis under-grill cabinet that the manufacturer suggests combining with these cabinets for a complete outdoor kitchen.
Integration of the variation with a false upper front
- Confirm that the element to be installed above the module can be a small sink or a built-in burner, as indicated in the technical data sheet.
- Mark the position of the sink or burner on the worktop and make the cut-outs following the chosen appliance’s instructions.
- Check that the cabinet’s upper front is non-functional and designed to reserve the technical void for the trap or the burner body.
- Connect plumbing or the burner supply and route the lines through the cabinet’s pre-prepared openings, avoiding tight bends.
- Check that the trap, tap, hoses or wiring do not intrude into the volume of the two operational drawers before closing everything up.
- Recheck levelling to ensure correct drainage at the sink where applicable.
Routing services through the pre-prepared openings
- Locate the pre-prepared openings for gas and electricity that the manufacturer includes to simplify installation.
- Decide which side panel or the rear you will use for the entry of each line according to the build layout.
- Protect the perimeter of the pass-throughs with grommets or trims your installer uses on site, which are not specified by the manufacturer.
- Maintain generous bend radii without kinks and leave accessible access for future inspections.
- On completion, carry out a functional test of the gas installation and electrical circuits in accordance with local regulations.
End-of-installation checks
- Open and close each drawer, checking alignment, consistency and that there is no rubbing against the worktop or adjacent modules.
- Check the visual line of the matt black front is continuous and step-free between modules.
- Confirm the worktop sits perfectly flush across the whole run and that joints to walls or cladding allow for expansion.
- On the false-front version, verify that plumbing or burner connections do not touch the cabinet structure or drawer hardware.
Daily use with tiered organisation
- Top drawer on the three-drawer variation dedicated to small utensils and seasonings; this same position is a non-functional front on the sink variation.
- Middle drawer intended for cooking accessories, thermometers and serving items.
- Bottom drawer with capacity for bulky items such as boards or containers.
- Keep the work area clear and return each item to its level to speed up the flow of the outdoor kitchen, as promoted by the manufacturer when highlighting ample storage.
Everyday cleaning of the finish and stainless fronts
- Remove dust, salt residue or splashes with a soft cloth and a neutral cleaner.
- Dry completely before closing the drawers to preserve the hardware and the appearance of the matt black front.
- Avoid abrasive products not recommended by the worktop supplier, as the worktop is not included and each material requires its own care.
- On stainless-steel fronts, use strokes in the direction of the grain to maintain the professional look highlighted by the manufacturer.
Suggested scheduled maintenance
- Monthly check of levelling and the smooth running of each drawer.
- Six-monthly check of visible fixings and the condition of the gas and electrical pass-throughs created using the pre-prepared openings.
- Inspection after heavy rain or wind events to remove deposits and clean again with a soft cloth and neutral product.
- Annual check of the visual continuity of the front and correct alignment with the rest of the Oasis modules to maintain a uniform appearance.
Specific advice for outdoor climates
- In coastal environments, clean more frequently to remove salt residue from stainless fronts and the matt black finish.
- In areas with airborne dust, increase light cleaning and prevent particles from entering the runners.
- If the paving settles, readjust the levelling feet until you restore the plane and smooth drawer closing; the manufacturer notes these feet allow the surface to be balanced even if the patio is not perfectly level.
Resolving typical issues without opening hardware
- The drawer does not close smoothly: check the module is level and remove any object blocking the travel.
- The front rubs against the worktop: lower the corresponding front foot by one or two millimetres until the edge clears.
- The drawer catches on an installation: review the routing of lines and reorganise the run through the pre-prepared openings, avoiding the drawer area.
- Water or salt marks appear: remove them with a soft cloth and neutral cleaner and dry immediately.
In-depth usage and installation plan in centimetres
Matt black finish with a Galvanneal steel body and two-coat pebbled powder coating system
Stainless steel drawer fronts
Unit delivered fully assembled
Pre-prepared openings for gas and electricity
Levelling feet
Worktop not included
Cabinet dimensions in centimetres: height 90, width 61, depth 61 in both variations
Pre-build phase
- Review the island plan and confirm that each recess allows for a height of 90, width 61 and depth 61 for this module
- Ensure the flooring is solid and allows levelling using the integrated feet
- Define the route for gas and electrical lines that the module can accommodate via the pre-prepared openings, as indicated by the manufacturer
- Choose a worktop material suitable for outdoor use and confirm with its manufacturer the fixing method and expansion clearances
- Check access routes to move the fully assembled unit into its final position and organise the manoeuvre with protection on corners and stainless fronts
Positioning and levelling
- Place the module in its location and adjust the feet until the front is perfectly vertical and the top fully level
- Using a long straightedge, confirm continuity with neighbouring modules and adjust the feet height until the top surface is at the same level
- Lock the position and check the drawers open and close smoothly to confirm the cabinet is not being twisted by the floor
- Repeat the process after fitting the worktop to ensure the top plane has not been altered by the weight of the surface
Worktop and coordination with the rest of the system
- Cut the worktop following the project dimensions and the worktop manufacturer’s instructions
- Set the worktop on all modules and confirm the drawer module leaves a clean, aligned edge
- Fix the worktop according to the procedure recommended by its manufacturer, respecting the planned service clearances
- For projects with a built-in grill, add the Oasis under-grill cabinet that the manufacturer recommends combining with these cabinets for a complete outdoor kitchen
Integration of the variation with a false upper front
- Confirm that the element to be installed above the module can be a small sink or a built-in burner, as indicated in the technical sheet
- Mark the position of the sink or burner on the worktop and make the cut-outs following the chosen appliance’s instructions
- Check that the cabinet’s upper front is non-functional and designed to reserve the technical void for the trap or the burner body
- Connect plumbing or the burner supply and route the lines through the cabinet’s pre-prepared openings, avoiding tight bends
- Check that the trap, tap, hoses or wiring do not intrude into the volume of the two operational drawers before closing everything up
- Recheck levelling to ensure correct drainage at the sink where applicable
Routing services through the pre-prepared openings
- Locate the pre-prepared openings for gas and electricity that the manufacturer includes to simplify installation
- Decide which side panel or the rear you will use for the entry of each line according to the build layout
- Protect the perimeter of the pass-throughs with grommets or trims your installer uses on site, which are not specified by the manufacturer
- Maintain generous bend radii without kinks and leave accessible access for future inspections
- On completion, carry out a functional test of the gas installation and electrical circuits in accordance with local regulations
End-of-build checks
- Open and close each drawer, checking alignment, consistency and that there is no rubbing against the worktop or adjacent modules
- Check the visual line of the matt black front is continuous and step-free between modules
- Confirm the worktop sits perfectly flush across the whole run and that joints to walls or cladding allow for expansion
- On the false-front version, verify that plumbing or burner connections do not touch the cabinet structure or drawer hardware
Daily use with tiered organisation
- Top drawer on the three-drawer variation dedicated to small utensils and seasonings; this same position is a non-functional front on the sink variation
- Middle drawer intended for cooking accessories, thermometers and serving items
- Bottom drawer with capacity for bulky cookware, boards or containers
- Keep the work area clear and return each item to its level to speed up the flow of the outdoor kitchen, as the manufacturer promotes when highlighting ample storage
Everyday cleaning of the finish and stainless fronts
- Remove dust, salt residue or splashes with a soft cloth and a neutral cleaner
- Dry completely before closing the drawers to preserve the hardware and the appearance of the matt black front
- Avoid abrasive products not recommended by the worktop finish supplier, as the worktop is not included and each material requires its own care
- On stainless steel fronts, use strokes in the direction of the grain to maintain the professional look highlighted by the manufacturer
Suggested scheduled maintenance
- Monthly check of levelling and the smooth running of each drawer
- Six-monthly check of visible fixings and the condition of the gas and electrical pass-throughs created using the pre-prepared openings
- Inspection after heavy rain or wind events to remove deposits and clean again with a soft cloth and neutral product
- Annual check of the visual continuity of the front and correct alignment with the rest of the Oasis modules to maintain a uniform appearance
Specific advice for outdoor climates
- In coastal environments, clean more frequently to remove salt residue from stainless fronts and the matt black finish
- In areas with airborne dust, increase light cleaning and prevent particles from entering the runners
- If the paving settles, readjust the levelling feet until you restore the plane and smooth drawer closing; the manufacturer notes these feet allow the surface to be balanced even if the patio is not perfectly level
Resolving typical issues without opening hardware
- The drawer does not close smoothly: check the module is level and remove any object blocking the travel
- The front rubs against the worktop: lower the corresponding front foot by one or two millimetres until the edge clears
- The drawer catches on an installation: review the routing of lines and reorganise the run through the pre-prepared openings, avoiding the drawer area
- Water or salt marks appear: remove them with a soft cloth and neutral cleaner and dry immediately