Napoleon Built-in Doors are designed for those who want to take the personalisation of their outdoor kitchens to the next level. Made from premium materials and designed for modular installations, they offer both functional performance and visual elegance. These doors are an unbeatable choice for those looking for an outdoor kitchen that combines comfort, strength and sophistication. With a wide range of sizes and configurations, they are perfectly suited to any architectural project, from private patios to professional outdoor kitchens.
Structural Strength and Professional Aesthetics
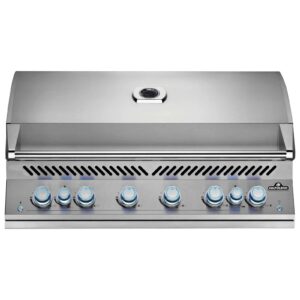
The body of each panel is constructed from high quality stainless steel, which guarantees excellent resistance to adverse weather conditions, corrosion due to humidity or exposure to grease and cooking chemicals. This type of steel is ideal for outdoor use because it maintains its structural integrity even in marine environments or in environments with large temperature fluctuations.
In addition to its strength, stainless steel provides a polished, modern finish that blends seamlessly with any contemporary décor. It will not fade over time or tarnish, maintaining a clean, elegant and professional appearance, even after years of intensive use.
Comfort, Safety and Longevity of Furniture
All variations are equipped with an advanced soft-close system, which allows the doors to close without exerting force, without noisy knocks and without unnecessary wear and tear on the hinges. This technology, inspired by luxury joinery systems, enhances the user experience to the maximum and prolongs the life of the mechanism.
This is particularly important in environments where air movement or frequent use can cause snap closures. Thanks to the soft closing, a safer, quieter and more durable environment is ensured. It is ideal for households with children, where safety is a priority, and also for maintaining a harmonious atmosphere at meetings or outdoor events.
Precise and Professional Installation with Seamless Finish
The panels are designed for fully built-in installation, allowing for seamless integration into custom-built outdoor kitchen structures. The seamless finish ensures that there are no protruding edges or visible joints, achieving a result of high aesthetics and maximum efficiency.
Each variant comes with specific dimensions for both the product and the installation space, allowing for exact space planning. This kind of technical precision makes work easier for both professional installers and experienced do-it-yourselfers. The doors are fixed with concealed hardware and structural reinforcements for permanent stability.
Lightweight, Durable and Elegant
The handles are constructed from anodised aluminium, a lightweight yet incredibly strong material that has been treated by electrolysis to create a hard protective coating. This treatment not only improves durability against corrosion and wear, but also provides an elegant satin finish.
Unlike other materials that can rust or discolour with frequent use, anodised aluminium handles retain their colour and texture for many years, even with direct exposure to sunlight and moisture. In addition, their ergonomic design facilitates effortless opening, improving accessibility.
Total freedom in the design of your outdoor kitchen
A key feature of this product is its reversible design, which allows you to choose the opening direction according to the need of the project. This flexibility is essential in custom kitchens, where space, flow of movement and access to each compartment must be optimised to the maximum.
Moreover, as part of Napoleon’s modular line of built-in components, these doors can be combined with drawers, shelves, side burners and other functional modules, allowing the design of fully customised kitchens, both in terms of aesthetics and functionality.
Tidiness and safety at all times
Each recessed door provides access to a fully enclosed compartment that can be used as storage for:
The fact that these spaces are protected by strong metal doors prevents the entry of dust, water, insects or animals. This results in a more hygienic, organised kitchen that is always ready for use.
Technical Variations and Dimensions for Precise Integration
The Napoleon range of built-in doors consists of the following variants:
| Model |
Configuration |
Outer dimensions (cm) |
Installation dimensions (cm) |
| Double 85 x 71 |
2 doors |
100 x 70,5 x 9,2 |
92,7 x 62,9 x 7,6 |
| 55 x 71 |
1 door |
54,6 x 70,2 x 9,2 |
47,3 x 62,9 x 7,6 |
| Double 85 x 50 |
2 doors |
100 x 50,2 x 9,2 |
92,7 x 42,5 x 7,6 |
| Double 58 x 50 |
2 doors |
114,9 x 50,2 x 9,2 |
108 x 42,5 x 7,6 |
| Double 85 x 71 |
2 doors |
84,8 x 70,5 x 9,2 |
77,5 x 62,9 x 7,6 |
| Double 85 x 50 |
2 doors |
84,8 x 50,2 x 9,2 |
77,5 x 42,5 x 7,6 |
| 55 x 50 |
1 door |
54,6 x 50,2 x 9,2 |
47,3 x 42,5 x 7,6 x 7,6 |
These options make it possible to adapt the kitchen design to suit every need, whether for storing large items or providing quick access to technical areas such as gas tanks.
Versatile design for all kinds of spaces
Although conceived for outdoor kitchens, these doors also integrate perfectly in other contexts, such as:
-
Enclosed terrace furniture
-
Outdoor washing areas
-
Indoor kitchens with industrial aesthetics
-
Workstations in workshops or garages
-
Garden cabinets
Thanks to their understated design and heavy-duty materials, they are a premium storage option that can be used in any environment that requires organisation, aesthetics and durability.
Recommended Maintenance to Preserve the Performance and Appearance of Your Napoleon Built-In Doors
Napoleon built-in doors are designed with the highest quality materials to withstand the demands of outdoor use. However, even the best components require periodic maintenance to ensure proper operation, maintain their professional appearance and maximise their durability.
Below is a
comprehensive, step-by-step guide to keeping your doors looking great, safe and operational for many years to come.
1. Regular Cleaning: Removing Grease, Dust and Environmental Stains
Cleaning should be performed after each heavy use, especially if greasy or smoky foods have been cooked near the area.
Procedure:
- Use a soft, non-abrasive cloth (preferably microfibre) dampened with warm water and mild soap.
- Clean the stainless steel surface in the direction of the polish to avoid marks.
- Dry thoroughly with a clean, dry cloth to prevent moisture or limescale stains.
Professional tip: In coastal areas or very humid environments, perform this cleaning at least twice a week to prevent salt build-up or persistent stains from salt condensation.
2. Monthly Polishing and Protection of Stainless Steel
In addition to basic cleaning, it is important to maintain the protective layer of the steel with specific products that provide shine and protection.
Procedure:
- Apply a small amount of stainless steel polish with a dry cloth.
- Spread the product over the entire surface, including frames, corners and visible hinges.
- Remove any excess and polish with a second clean cloth until a shiny finish is achieved.
Benefit: This step creates a barrier that repels dust, salt and grease, maintaining a professional appearance for longer.
3. Bi-monthly lubrication of hinges and closing mechanisms
The smooth closing system and hinges require periodic lubrication to continue operating smoothly and quietly.
Procedure:
- Use a silicone spray lubricant or dry grease specially formulated for metal hardware.
- Apply sparingly directly to the pivot points of the hinges and the lock guides.
- Open and close the doors several times to ensure that the lubricant penetrates properly.
Avoid: Petroleum-based lubricants, as they can attract dirt and deteriorate seals or fine mechanisms over time.
4. Quarterly Structural Fastening and Alignment Check
This step prevents premature wear, looseness and misalignment caused by heavy use, exposure to wind or moisture.
Inspection to be performed:
- Check that all screws are tight and that there is no sideways movement.
- Make sure that the doors remain aligned and close symmetrically.
- Visually check that there are no rust spots on the hinges or metal frames.
In case of misalignment: Make adjustments using precision tools and, if necessary, replace corroded screws with marine-grade stainless steel versions.
5. Seasonal Protection: Prevention of Damage from Extreme Weather
In climates with sudden temperature changes or during months of less use (winter), additional protection is recommended.
Recommendations:
- Apply a protective wax for stainless steel to act as a waterproof barrier.
- Cover the area with a breathable tarpaulin if the kitchen does not have a roof.
- Ventilate the interior compartments occasionally to prevent condensation.
6. Good Interior Storage Practices
Correct use of the compartments also prolongs the integrity of the doors.
Recommendations:
- Do not overload the interior with heavy objects that could press against the panel or misalign the hinges.
- Avoid storing aggressive chemicals such as solvents or acids that could release corrosive vapours.
- Use plastic organisers or trays to prevent objects from coming into direct contact with metal surfaces.
Expected Results of Proper Maintenance
With this maintenance routine:
- The doors will retain their original shine and finish, without losing their appearance over time.
- The closing mechanisms will work like new, quietly and smoothly.
- The level of structural safety will remain high, with no risk of falls or blockages.
- The interior compartments will remain clean and functional, ready for immediate storage of utensils or gas cylinders.
Keeping your
Napoleon Built-In Doors in top condition is simple and highly beneficial: you will extend their useful life, protect your investment and ensure that your outdoor kitchen always looks like new.
Smoked Fajitas with Rosemary Honey, Lemon and Jalapeño Recipe + Vegetarian Version with Grilled Mushrooms
Take advantage of your outdoor kitchen equipped with Napoleon built-in components to prepare this exclusive, flavourful recipe. Grilled fajitas with rosemary honey and jalapeño combine sweet, citrus and spicy notes. The vegetarian version with portobello mushrooms and grilled chickpeas is a delicious option, rich in texture and vegetable protein.
Ingredients for 4 people:
Chicken version:
- 2 whole chicken breasts
- 2 tablespoons rosemary honey
- Juice of 2 lemons
- 1 fresh jalapeño, chopped
- 1 teaspoon ground cumin
- 1 teaspoon smoked paprika
- 2 cloves garlic, crushed
- Olive oil, salt and black pepper
- 1 red onion, julienned
- 1 red and 1 yellow bell pepper
- Wheat or corn tortillas
Vegetarian version:
- 4 large portobello mushrooms, sliced
- 1 cup cooked chickpeas
- Juice of 1 lime
- 1 tablespoon sesame oil
- 1 teaspoon smoked paprika
- Salt, pepper and fresh coriander
Step-by-step preparation:
1. Marinate the ingredients (at least 2 hours):
Mix the marinade ingredients. Place the chicken or mushrooms in a bowl with the chickpeas, cover and let stand in the refrigerator. The longer they marinate, the more flavour they will absorb.
2. Prepare the grill:
Light the barbecue to medium-high heat. While it's heating up, organise your ingredients, accessories and cutting boards from the storage space in your built-in doors.
3. Grill with precision:
Cook the chicken for 6-7 minutes on each side, or until cooked through and juicy.
For the vegetarian version, grill the chickpeas first on a griddle pan, then the mushrooms until seared and tender. Grill the peppers and onions alongside the proteins.
4. Warm the tortillas:
Place them on the grill briefly or wrap them in foil and warm them indirectly so they are flexible and warm.
5. Assemble the fajitas:
Fill each tortilla with a portion of protein, roasted vegetables and a drizzle of additional rosemary honey. You can add sour cream, guacamole or fresh salsa to taste.
6. Serve and enjoy:
Serve on a wooden board with a variety of accompaniments. Ideal for sharing in a relaxed outdoor setting.